

Hello friends and welcome to the first of my weekend posts! I had a bit of a lazy morning today, after the busyness of yesterday’s Clarity Social TV shows but am spending the afternoon with my baby grandson, so all’s well in my world. I’ve got another of my demos from yesterday to share with you, using these fabulous Royal Gnomes stamps that Barbara drew for the King’s Coronation two years ago (how time flies!) I was particularly excited as, having looked at these for the show, I thought they’d make great cards for kids (and bigger kids too!) especially if we had some sentiments. Well, I sent a quick email to Barbara suggesting that, together with a few thoughts on possible wording and, next thing I knew, a brand new pack of sentiments dropped through my letterbox – my suggestions had been turned into stamps!
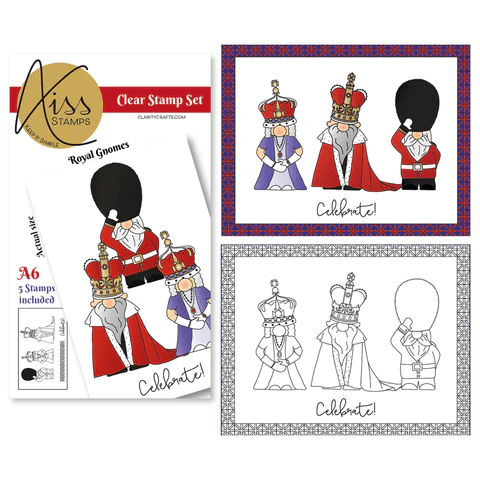

So, I jumped into action to make a first card fit for a King! After stamping the Royal Gnome onto one of Clarity’s 3.5″ squares of stencil card, I covered him over with the pre-cut mask that’s in the set and then laid Clarity’s castle mask cross him to create my background scene. I first sponged ‘pumice stone’ Distress Oxide down from the mask to create an undercoat, then used a torn piece of copy paper to sponge ‘hickory smoke’ and define the walls of the castle with shadows.

I lifted off the castle mask and switched to the clouds (one of my favourites, as you may have noticed!), using a stencil brush and ‘broken china’ Distress Oxide to create my sky. I shaded in the king with Pergaliner pencils, then used Dorso oil and a blending nib to smooth out the colour on his cloak and crown (trying to make it look a bit more velvety!) I also used Clarity’s metallic gel pens to highlight the jewels in his crown, so they shimmer a little

At this point, he was still levitating slightly, so I picked up the torn copy paper again, laid it across his feet and sponged ‘rustic wilderness’ Distress Oxide across it so he looks like he’s standing on the lawn. Obviously I added one of the new sentiments, then popped it onto a mount cut from Clarity’s ‘lattice’ nested doodle frame-it panel dies and then onto a 5×5 card blank.

I am totally in love with these little Royal Gnomes and like a dog with two tails at having my suggestions turned into a set of sentiments! Back to reality, though, I’m going to pop this little chap into the galleries at Just Us Girls where their theme is stencilling, and at StencilFun too.

Discover more from Deborah's Crafty Blog
Subscribe to get the latest posts sent to your email.

Fab make Debs! X
LikeLiked by 1 person
From maddiep
LikeLiked by 1 person
Thanks so much Maddie!
LikeLike
What an awesome card! Love the frame you’ve done for this royal distinguished crown!
LikeLike
They are brilliant little characters!
LikeLike
Brilliant. The frame is perfect and the background castle is just right for the king.
LikeLiked by 1 person
thanks Johanna x
LikeLiked by 1 person
This royal fella is too much fun, but it’s that fabulous castle behind him that drew me in! Great card, Deborah. Thanks for sharing it with us at Just Us Girls!
LikeLiked by 1 person
OMGosh, I love this! Dude’s got it going on! 😉
LikeLiked by 1 person
Thanks so much Leslie! They are fab little characters!
LikeLiked by 1 person
Oh, how fun and creative this is! Thanks so much for joining our challenge at Stencil Fun!
Diane SF Co-Owner
LikeLiked by 1 person
Every king needs his castle and the stenciled one is fabulous, Deborah. Great coloring on the king and the frame is regal just like him. Thanks for sharing your card with us at Just Us Girls.
LikeLiked by 1 person
Such a fun card – it must have took a while with the masking and shading – xx
LikeLiked by 1 person
It was quite straightforward really – I managed to demo it live on the Clarity show!
LikeLiked by 1 person
I’ll check the show out…..xx
LikeLiked by 1 person
[…] well, as this card is bascially a CASE (Copy & Selectively Edit) of the layout from my recent King of the Castle card! I started by stamping party girl onto one of Clarity’s 3.5″ stencil card squares […]
LikeLike